Your cart is currently empty!
Watering Your Garden With Soaker Hose Tips

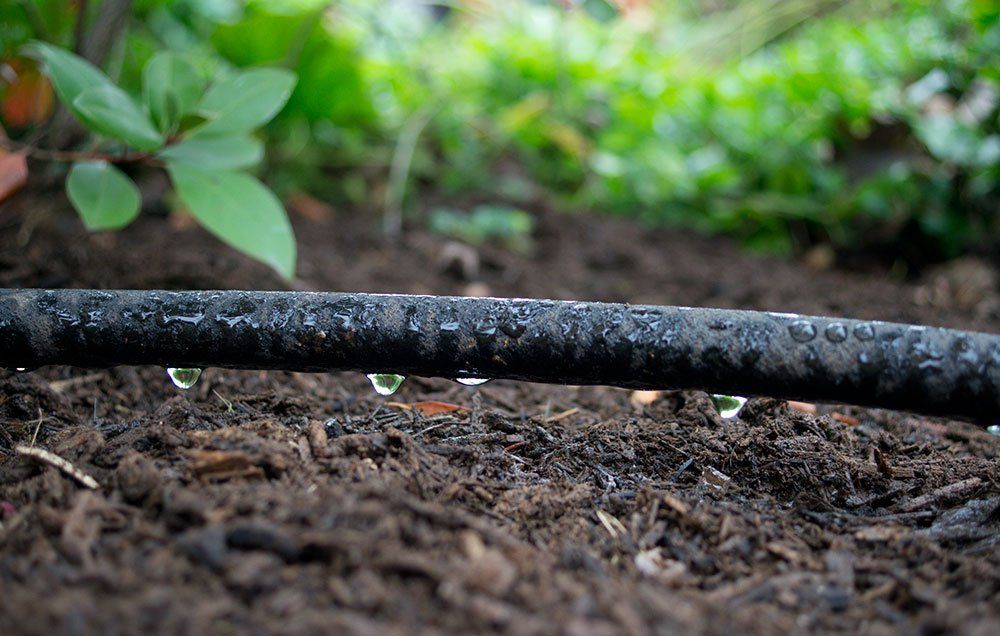
Soaker hoses are a great way to water your garden without losing too much water to evaporation. Read on to learn more about how to use one and how to set up a system that works best for your needs.
In addition to preventing weeds, soaker hoses help maintain healthy soil by directing water directly to the roots. Soaker hoses also keep plants looking vibrant and healthy.
Connect the Hose
Watering your garden with a soaker hose can save you a lot of time and stress, while keeping your plants healthy. It’s also more efficient than drip irrigation, which uses flexible plastic tubing with tiny holes or emitters that slowly drip water into the soil.
A soaker hose can be installed in a variety of ways, depending on your needs and yard layout. For example, you can install individual stretches of hose no longer than 100 feet to deliver water to specific zones.
You can also connect multiple hoses together, using a hose splitter. This allows you to easily switch water sources from one area to another.
When laying out the hose, be sure to position it downhill from the spigot and to avoid watering the areas above and below it. This will ensure that the water goes downhill, instead of uphill, and distributes it evenly over your yard or flower garden.
After you’ve set up your soaker hose, it’s best to flush it once or twice a year to remove any debris and make sure it’s not plugged or kinked. It’s also a good idea to cover it with mulch, which will camouflage it and retain moisture.
Lay It Out
Laying out the hose in your garden beds is important to make sure that water reaches all of the plants you want to be watered. To do this, you need a soaker hose that is long enough to cover all of the plants in your garden bed.
Position the hoses near each plant within 6 to 12 inches of its base. On slopes, run across the slope instead of up and down to help control seepage and create a more even distribution of water.
Bushes and shrubs can be surrounded by soaker hoses that are 18 inches or longer (sandy soil) to 24 inches or longer (clay soil). Annual flowers are better suited to shorter runs that are closer to the plants, about 12-18 inches apart.
Once you have the hose positioned, you need to figure out how to connect it to your water source. You can use tee couplers, corners, or straight pipes to make the connection. These are all available at your local home improvement store and come in different sizes.
Cover It
If you’re planning on putting your hose over a large area, covering it with 2 inches of mulch can help retain moisture and reduce evaporation. This also helps keep weeds at bay and prevents sun damage to the hose.
You can find a variety of different materials to use to cover your hose, including mulch, decorative rocks, and even a garden hose reel cover (like our Ovo Universal Padded Hose Cover). It’s best to choose a material that will stand up to the elements.
Start by laying out the soaker hose in your chosen orientation and figure out how you want to connect it to your water source. You may need something as simple as a 3-way splitter, a tee coupler, or a corner, or you can use something more elaborate like a series of straight pipes. Cap one end of the hose with a hole plug to protect it from soil and insects, and then attach it to your connector or tee fitting.
Flush It
Watering your garden with a soaker hose can cut down on water use by up to 50 percent. This is because a soaker hose is designed to directly reach the soil, where it is most needed by plants.
However, it is important to maintain your hose system so that it can function properly. This includes flushing the hose with water to remove any debris that has built up over time.
Soaker hoses can be clogged with calcium deposits that are formed from hard water, which means they aren’t as effective as they could be. To prevent this from happening, flush your hose one or two times a year to clear out the buildup of debris.
When setting up a soaker hose, make sure it’s placed on level ground to ensure even distribution of water. Jagged terrains can cause parts of the hose to collect water differently and result in dry spots in the garden.
by
Tags: